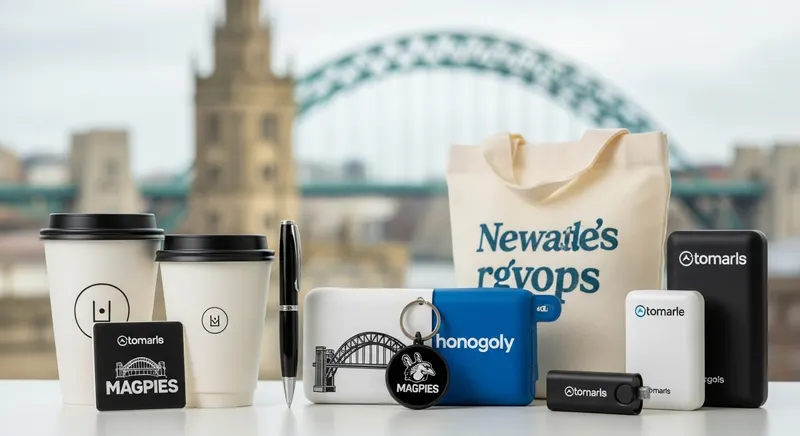
How to Design a Work Shirt Your Team Will Actually Want to Wear
Learn how to design a work shirt for your business or school in Australia — from decoration methods to fabrics, colours, and ordering tips.
Written by
Riley Singh
Custom Apparel
Getting the design right for a work shirt sounds straightforward — slap a logo on a polo, done. But anyone who’s managed a uniform order for a team, school, or organisation knows the reality is a little more nuanced. The fabric choice affects comfort on a 38-degree Brisbane afternoon. The decoration method determines whether your logo still looks crisp after 50 washes. The colour selection speaks volumes about your brand before a single word is exchanged. Whether you’re outfitting a customer-facing retail team in Melbourne, kitting out school staff in Adelaide, or sourcing uniforms for a corporate event in Sydney, knowing how to properly design a work shirt can save you time, money, and a whole lot of second-guessing.
Why Work Shirt Design Matters More Than You Think
A well-designed work shirt does far more than identify your team. It acts as a walking billboard for your brand, builds team cohesion, and — when done right — makes employees genuinely proud to wear it. On the flip side, a poorly designed shirt ends up stuffed in a drawer by week two, doing nothing for your brand and nothing for morale.
The Australian workforce is diverse, and expectations around workplace attire have shifted considerably. Staff want comfortable, well-fitting garments that look professional without feeling like a costume. At the same time, organisations need shirts that hold up to daily wear, remain consistently branded across large teams, and comply with practical requirements like sun protection or hi-vis visibility in certain industries.
Understanding what goes into designing a great work shirt means thinking about the full picture — not just aesthetics, but fabric, fit, function, and the decoration method that brings your branding to life.
Step 1: Define Your Purpose Before You Design a Work Shirt
Before you touch a design brief or pick a colour, get crystal clear on the shirt’s primary purpose. Ask yourself:
- Will staff wear this in a customer-facing environment, or is it for internal use?
- Does the role involve physical activity, outdoor work, or air-conditioned office settings?
- Is there a specific industry compliance requirement, such as hi-vis or UPF-rated fabric?
- Will the shirt need to work across genders, body types, and age ranges?
A Perth construction company sourcing shirts for site supervisors has entirely different requirements from a Gold Coast real estate agency wanting smart-casual branded polos for their sales team. Clarifying the purpose upfront shapes every decision that follows.
If your work environment involves outdoor exposure, it’s worth exploring performance fabrics with UPF ratings. For office or retail settings, classic cotton or cotton-poly blends tend to hit the sweet spot between comfort and a polished look. Take a browse through our guide to work polo shirts for a breakdown of fabric types and style options suited to different environments.
Step 2: Choose the Right Shirt Style
Work shirts come in several distinct categories, and the one you choose sets the tone for everything else.
Polo Shirts
The most popular choice for businesses across Australia. Polos offer a professional look without the formality of a button-down, making them suitable for retail, hospitality, trades, and office environments alike. They come in short and long sleeve options and are available in a wide range of colours.
Button-Down Business Shirts
Ideal for corporate, real estate, or banking environments where a more formal presentation is expected. These typically feature embroidery on the chest rather than large printed logos.
T-Shirts
Often used for events, schools, and casual workplaces. If you’re designing shirts for a school fun run or a company volunteer day rather than everyday uniforms, a custom printed t-shirt gives you more creative freedom and typically costs less per unit.
Hi-Vis and Safety Shirts
For organisations in construction, transport, logistics, or outdoor services, safety-rated shirts must meet Australian Standards. This is non-negotiable, and your supplier should be familiar with the relevant compliance requirements.
Step 3: Select Your Colour Strategy
Colour is one of the most powerful elements when you design a work shirt — and one of the most overlooked. A few key principles:
Match your brand palette. Start with your existing brand colours and work outward. If your logo and brand assets use navy and gold, your shirt colour should reflect that. PMS (Pantone Matching System) colour matching is available with many decoration methods and ensures your branding stays consistent across all your promotional materials — from shirts to branded water bottles and travel mugs.
Consider practicality. White shirts look sharp in photos but show every coffee spill. Darker colours may be more forgiving in trade and hospitality environments. Mid-tones like navy, charcoal, and bottle green tend to be universally flattering and easy to keep looking neat.
Think about contrast for decoration. Your logo or text needs to stand out against the shirt colour. A dark navy shirt with a black embroidered logo is going to be nearly invisible. A white or gold logo on that same navy shirt, however, looks sharp and professional.
Step 4: Choose Your Decoration Method
This is where many organisations trip up — and getting it wrong can be costly. The decoration method you choose depends on your artwork, the shirt material, and how the finished product will be used.
Embroidery
The premium choice for corporate work shirts. Embroidery uses thread stitched directly into the fabric, creating a tactile, durable finish that holds up beautifully through repeated washing. It’s particularly well-suited to polo shirts and button-downs, and projects a professional, high-quality image. It works best with logos that have clean lines and limited colour complexity. Typical MOQs for embroidery can be as low as 6–12 pieces, making it viable even for small teams.
Screen Printing
Ideal for larger quantities and bolder designs. Screen printing applies ink through a stencil onto the fabric, producing vibrant, long-lasting results. It’s cost-effective at higher volumes (usually 50+ units) and works well on t-shirts and casual work shirts. Setup fees apply per colour, so designs with fewer colours are more economical.
Heat Transfer and Digital Printing
Heat transfer (including DTG — direct-to-garment printing) suits detailed, full-colour artwork and smaller runs. It’s a strong option when your design includes photographic elements or gradients that screen printing can’t easily reproduce. The tradeoff is durability — heat-applied prints may not last as long as embroidery or screen printing.
Sublimation
Sublimation prints directly into the fabric rather than on top of it, resulting in vibrant, all-over designs that don’t crack or peel. It’s best suited to 100% polyester garments and is widely used for sports shirts and performance wear.
Step 5: Plan Your Artwork and Branding Placement
Placement is everything. The most common positions for work shirt branding are:
- Left chest — the standard for embroidery and small logo placements
- Back — popular for trades, event shirts, and roles where staff are often seen from behind
- Sleeve — used for secondary branding, department names, or safety messaging
- Full front — suits bolder, event-style designs on t-shirts
Provide your artwork as a vector file (AI, EPS, or SVG) wherever possible. Vector files scale without losing quality, which is critical when resizing logos for different placements. If you only have a JPEG, speak with your supplier — most can convert files, though additional fees may apply.
A Canberra government department outfitting 200 staff would typically supply the logo in vector format, specify PMS colours, and confirm placement before any production begins. Rushing this stage is where costly reprints happen.
Step 6: Understand MOQs, Sizing, and Ordering Practicalities
Most work shirt suppliers in Australia have minimum order quantities (MOQs) that vary by decoration method and product. Embroidered polos might have an MOQ of 6–12, while screen-printed t-shirts typically start at 20–50 units.
Order a size run that accounts for your full team. Collect sizing information in advance and round up — it’s nearly always cheaper to order a few extras in a bulk run than to reorder small quantities later.
Turnaround times are worth planning for. Standard production for embroidered or screen-printed work shirts in Australia typically runs 10–15 business days. Rush orders are available from some suppliers (particularly in major centres like Sydney, Melbourne, and Brisbane), but they attract premium pricing. For a deeper look at last-minute options, the article on same-day promotional product printing in Adelaide offers useful context on what’s realistically achievable under tight deadlines.
It’s also worth thinking about your broader promotional merchandise mix. Many organisations bundle work shirt orders with complementary branded items — things like tote bags and backpacks, custom notebooks and stationery, or tech accessories like USB drives — and negotiate better pricing across the whole order.
Step 7: Request a Sample Before Full Production
Never skip the sample stage, especially for large orders. A pre-production sample lets you check colour accuracy, placement, logo sizing, fabric quality, and fit before hundreds of shirts roll off the production line. Some suppliers charge a small fee for samples; others include them in larger order commitments. Either way, it’s money well spent.
If you’re working with a new supplier, our roundup of promotional products suppliers in Australia can help you identify reputable partners who understand local quality expectations and delivery requirements.
Budgeting to Design a Work Shirt at Scale
Costs vary significantly based on quantity, decoration method, and shirt quality. As a rough guide:
- Basic t-shirts with screen printing: $8–$20 per unit (depending on quantity and colours)
- Polo shirts with embroidery: $25–$55 per unit
- Corporate button-down shirts with embroidery: $40–$80 per unit
- Setup fees: $30–$80 per colour/location for screen printing; embroidery digitising typically $30–$60 as a one-time fee
Bulk orders bring per-unit costs down significantly. Refer to The Promo Edit’s guide to promotional products in Australia for a broader overview of how pricing tiers work across the industry, and check the promotional products industry statistics for 2026 for current market benchmarks.
Budget-conscious organisations might also want to understand seasonal purchasing patterns — ordering outside peak periods (particularly January–February and the lead-up to Christmas) can sometimes yield better pricing and more attentive service from suppliers.
Key Takeaways
Knowing how to design a work shirt effectively comes down to a few core principles that apply whether you’re outfitting 10 people or 1,000:
- Define the purpose first — the working environment, compliance needs, and user demographics should shape every design decision
- Match decoration method to your artwork and use case — embroidery for corporate polish, screen printing for bold designs at volume, sublimation for performance wear
- Colour strategy matters — align with your brand palette, consider practicality, and always ensure adequate contrast for your logo
- Invest in the artwork preparation stage — clean vector files and clear placement specifications prevent costly mistakes
- Request a sample before full production — even a small additional cost upfront can save significant expense if something needs correcting
- Plan your order size and timeline carefully — factor in MOQs, turnaround times, and seasonal demand peaks
With the right approach, a well-designed work shirt becomes one of the most effective and long-lasting branded assets your organisation can invest in.